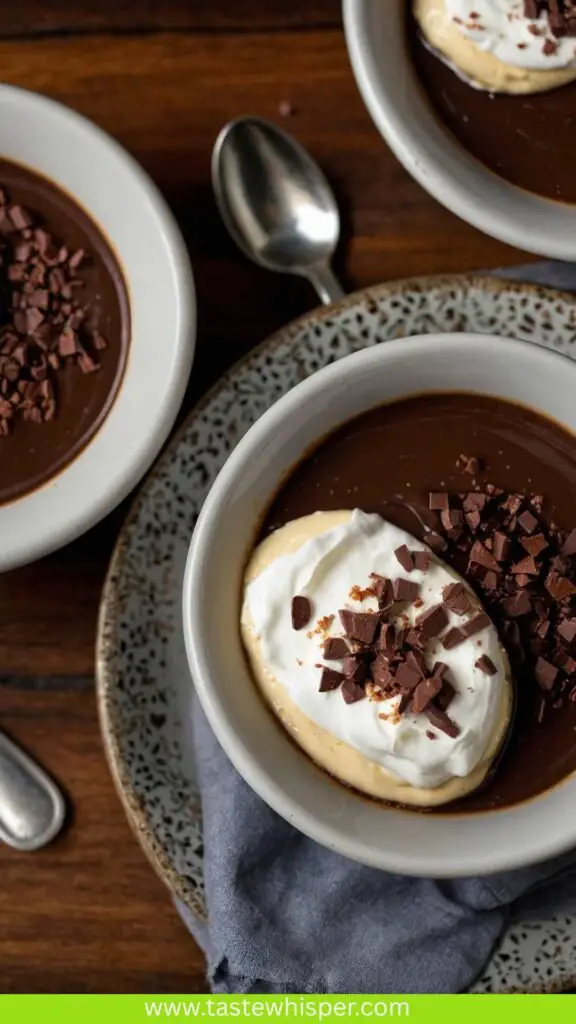
Before diving into the rich world of chocolate pots de crème, let’s talk about what goes well with this silky dessert. You could serve it with a dollop of whipped cream, a sprinkle of cocoa powder, or even fresh berries for a refreshing contrast.
If you’re feeling adventurous, try pairing it with a glass of dessert wine, like a sweet Sauternes or a rich port. The complement of flavors is a delight that’ll keep your guests coming back for more!

You’ll Also Like These Recipes
Why This Recipe is Right for You
Let’s be honest—there’s something truly magical about chocolate pots de crème. It’s not just a dessert; it’s an experience. It’s seemingly effortless yet incredibly impressive. Imagine bringing this to a gathering and watching your friends and family dig in. It feels like you pulled off the impossible, right? And guess what? You did! This recipe is simple, elegant, and perfect for any occasion. Whether you’re entertaining guests or just treating yourself, this recipe won’t disappoint.
I’ve prepared this dessert more times than I care to count, and each time it’s a hit. It offers that deep chocolate flavor combined with a luxuriously creamy texture. And let me tell you, the balance of flavors here is something to write home about. Let’s break this down using ingredients that I’ve come to love.
Ingredients You’ll Need
Here’s what you’ll be working with:
- 6 ounces high-quality semisweet chocolate, chopped
- 5 large egg yolks, at room temperature
- 1 cup full-fat whole milk
- 1 cup heavy whipping cream
- ¼ teaspoon fine kosher salt
- ½ teaspoon instant espresso powder
- 1 teaspoon pure vanilla extract
- 1 tablespoon light brown sugar (optional)
Each of these ingredients brings something special to the table. High-quality chocolate is non-negotiable. It’s the star! The egg yolks create that luscious custard base. Whole milk and heavy cream? They add richness that makes each bite feel indulgent. The salt enhances those flavors beautifully. Espresso powder? Oh, that’s like adding a secret weapon against bitterness. And vanilla? It just ties everything together in warmth. Finally, a touch of brown sugar balances it all perfectly.
How to Make Chocolate Pots de Crème
Let’s get down to the nitty-gritty. Follow these steps, and you’ll be well on your way to dessert heaven.
Step 1: Preheat Your Oven
Start by preheating your oven to 325°F (160°C). You’ll want it nice and cozy for your chocolatey delights.
Step 2: Melt the Chocolate
In a heat-proof bowl, combine the chopped chocolate with ½ cup of the cream. Set this bowl over a saucepan of simmering water, ensuring the bowl doesn’t touch the water. Stir until the chocolate is melted and smooth. This method is a classic—easy to control the heat without burning that luscious chocolate.
Step 3: Whisk Egg Yolks
In a separate bowl, whisk the egg yolks until they become pale and slightly thickened. This step isn’t just about texture; it’s about infusing air into the mixture for that creamy finish.
Step 4: Heat the Milk and Cream
In a saucepan, combine the remaining ½ cup of the cream with the whole milk, salt, and light brown sugar (if using). Heat gently until steaming, but not boiling. This is when you want to draw the flavors out, especially if you add espresso powder and vanilla.
Step 5: Combine Everything
Slowly pour the hot milk mixture into the bowl of egg yolks while whisking constantly. This step is critical—if you pour too fast, you risk scrambling the eggs. Be patient and keep whisking.
Step 6: Mix with Chocolate
Pour this mixture back into the saucepan with your melted chocolate. Whisk until everything is well combined. You’ll notice the mixture darkening and thickening just a bit as you go, and that’s a good sign.
Step 7: Strain the Mixture
Strain the chocolate custard through a fine-mesh sieve into another bowl, discarding any bits that didn’t blend smoothly. This helps you achieve that velvety texture you’re after.
Step 8: Pour into Ramekins
Divide the chocolate mixture evenly among your ramekins. You want them filled to about three-quarters full to allow for slight expansion during baking.
Step 9: Water Bath
Place the ramekins in a baking dish and fill the dish with hot water, halfway up the sides of the ramekins. This water bath will create gentle heat, making for a silky texture.
Step 10: Bake
Bake for about 25 to 30 minutes or until just set around the edges. The centers will be slightly wobbly but will firm up as they cool. Remove from the oven and let them cool in the water bath before transferring to the fridge.
Step 11: Chill and Serve
Chill in the refrigerator for at least 4 hours, but overnight is best! Once set, you can garnish with whipped cream, cocoa powder, or fresh berries before serving. Indulge in every creamy, chocolatey bite!

Recipe Notes
- Chocolate: Always go for high-quality chocolate, preferably from a brand you trust. The taste is worth it.
- Egg Yolks: Room temperature yolks mix in better, yielding a smoother custard.
- Dairy: Full-fat products are key here. They ensure the pots de crème come out rich and creamy.
- Salt: Enhances the chocolate flavor in a delightful way. Don’t skip it!
- Espresso Powder: This optional ingredient won’t make your dessert taste like coffee. Instead, it enhances the chocolate’s depth.
- Vanilla Extract: A quality extract adds layers of flavor beyond just sweetness.
- Brown Sugar: Optional but highly recommended. It adds a slight caramel taste that makes the dessert even more enticing.

Recipe Variations
You can switch things up a bit! Try these variations to keep it interesting:
- Spiced Chocolate: Add a pinch of cinnamon or cayenne pepper to the chocolate mixture for a warm spice kick.
- Nutty Twist: Incorporate finely chopped hazelnuts or almonds into the mixture for a bit of crunch.
- Mint Chocolate: Add ½ teaspoon of peppermint extract for a fresh twist on the classic chocolate flavor.
- Dark Chocolate Delight: Use dark chocolate instead of semisweet for a richer taste experience.
- Fruit Fusion: Top with caramelized bananas or a raspberry coulis for a fruity contrast.
- Nut-Free: Simply omit any nutty ingredients, and you’ll still enjoy a deliciously decadent dessert.
Chocolate Pots de Crème
Equipment
- Saucepan, Bowl
Ingredients
- 6 ounces high-quality semisweet chocolate chopped
- 5 large egg yolks at room temperature
- 1 cup full-fat whole milk
- 1 cup heavy whipping cream
- ¼ teaspoon fine kosher salt
- ½ teaspoon instant espresso powder
- 1 teaspoon pure vanilla extract
- 1 tablespoon light brown sugar optional
Instructions
Step 1: Preheat Your Oven
- Start by preheating your oven to 325°F (160°C). You’ll want it nice and cozy for your chocolatey delights.
Step 2: Melt the Chocolate
- In a heat-proof bowl, combine the chopped chocolate with ½ cup of the cream. Set this bowl over a saucepan of simmering water, ensuring the bowl doesn’t touch the water. Stir until the chocolate is melted and smooth. This method is a classic—easy to control the heat without burning that luscious chocolate.
Step 3: Whisk Egg Yolks
- In a separate bowl, whisk the egg yolks until they become pale and slightly thickened. This step isn’t just about texture; it’s about infusing air into the mixture for that creamy finish.
Step 4: Heat the Milk and Cream
- In a saucepan, combine the remaining ½ cup of the cream with the whole milk, salt, and light brown sugar (if using). Heat gently until steaming, but not boiling. This is when you want to draw the flavors out, especially if you add espresso powder and vanilla.
Step 5: Combine Everything
- Slowly pour the hot milk mixture into the bowl of egg yolks while whisking constantly. This step is critical—if you pour too fast, you risk scrambling the eggs. Be patient and keep whisking.
Step 6: Mix with Chocolate
- Pour this mixture back into the saucepan with your melted chocolate. Whisk until everything is well combined. You’ll notice the mixture darkening and thickening just a bit as you go, and that’s a good sign.
Step 7: Strain the Mixture
- Strain the chocolate custard through a fine-mesh sieve into another bowl, discarding any bits that didn’t blend smoothly. This helps you achieve that velvety texture you’re after.
Step 8: Pour into Ramekins
- Divide the chocolate mixture evenly among your ramekins. You want them filled to about three-quarters full to allow for slight expansion during baking.
Step 9: Water Bath
- Place the ramekins in a baking dish and fill the dish with hot water, halfway up the sides of the ramekins. This water bath will create gentle heat, making for a silky texture.
Step 10: Bake
- Bake for about 25 to 30 minutes or until just set around the edges. The centers will be slightly wobbly but will firm up as they cool. Remove from the oven and let them cool in the water bath before transferring to the fridge.
Step 11: Chill and Serve
- Chill in the refrigerator for at least 4 hours, but overnight is best! Once set, you can garnish with whipped cream, cocoa powder, or fresh berries before serving. Indulge in every creamy, chocolatey bite!
Notes
- Chocolate: Always go for high-quality chocolate, preferably from a brand you trust. The taste is worth it.
- Egg Yolks: Room temperature yolks mix in better, yielding a smoother custard.
- Dairy: Full-fat products are key here. They ensure the pots de crème come out rich and creamy.
- Salt: Enhances the chocolate flavor in a delightful way. Don’t skip it!
- Espresso Powder: This optional ingredient won’t make your dessert taste like coffee. Instead, it enhances the chocolate’s depth.
- Vanilla Extract: A quality extract adds layers of flavor beyond just sweetness.
- Brown Sugar: Optional but highly recommended. It adds a slight caramel taste that makes the dessert even more enticing.
Nutrition
Frequently Asked Questions
Can I make this recipe vegan?
You can create a vegan version by using dairy-free chocolate. Substitute coconut milk and aquafaba (chickpea water) for the cream and egg yolks.
How long do these last in the fridge?
Properly stored, they can last up to five days in the refrigerator. Just cover them well!
Can I freeze pots de crème?
Yes, you can, but be aware that freezing may alter the texture slightly. Thaw them in the fridge before serving.
Is there a non-dairy alternative to heavy cream?
Yes! Look for coconut cream or a nut-based cream like cashew cream.
What size ramekins do I need?
Typically, 4-ounce ramekins work well for individual servings. You can use larger ones, but adjust the baking time accordingly.
Can I use chocolate chips instead of chopped chocolate?
While you can use chocolate chips, they often contain stabilizers which may affect heat distribution. Chopped chocolate is more reliable for a smooth texture.
In Conclusion
Chocolate pots de crème is not just another dessert; it’s a moment of joy in a cup. As a registered dietitian and food enthusiast, I can assure you that making this dessert has never been easier or more rewarding. Beyond the simple ingredients, it’s about indulging in something that feels luxurious, without breaking the bank or spending hours in the kitchen.
So roll up your sleeves, gather your ingredients, and dive into this rich world of chocolate. Each pot is a small treasure waiting to be discovered. Trust me; you’ll be glad you did!
Now after following this guide, get ready to hear those compliments roll in. Enjoy your delicious creation, and remember—share, but only if you feel generous!


