
Before diving into the nitty-gritty of homemade mayonnaise, let’s chat about what you can pair this creamy delight with. Imagine a fresh turkey sandwich loaded with crisp lettuce, juicy tomato, and that luscious mayo slathered inside. Or picture dipping freshly fried potato wedges, hot and golden, right into that silky goodness. And don’t forget a veggie platter; veggie sticks become gourmet when dunked in homemade mayo. The options are endless, and your taste buds are in for a treat.

You’ll Also Like These Recipes
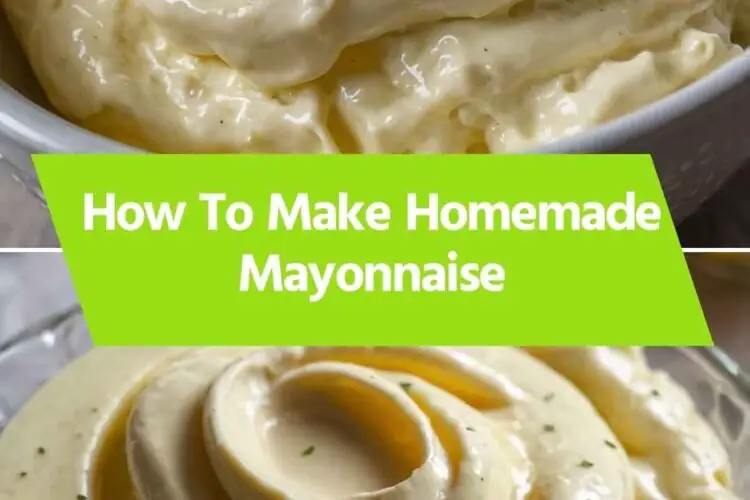
Hey there, mayo lovers! Let’s talk about a kitchen staple that often gets a bad rap. You probably know it as a spread or a dip, but I’m here to tell you that homemade mayonnaise is so much more than that. It’s creamy, it’s rich, and it’s bursting with flavor. One sunny afternoon, I decided to tackle mayo from scratch, and let me tell you, the experience was enlightening. I’m sharing all the juicy details, because homemade mayonnaise is not just a sidekick; it’s a star ingredient.
You’ll want to keep this recipe on hand. It’s versatile. It complements everything from sandwiches to salads, and it can easily be adjusted to suit different tastes. So, ready to become a mayo-making wizard? Let’s get started!
Why This Recipe Works
Before we jump into the details of the recipe, let’s take a moment to appreciate why this method works so well. Here are four powerful reasons:
1. Fresh Ingredients Make a Difference
Using fresh, high-quality ingredients is crucial. This recipe calls for a farm-fresh egg, which serves as the base. Fresh eggs yield a creamier texture and an unbeatable flavor. Trust me; you’ll taste the difference.
2. Emulsification Made Easy
What sets this mayo apart is the emulsification process. This recipe ensures that the oil and egg blend seamlessly. With the right whisking technique, you create a stable emulsion. It’s all about patience and technique. Don’t rush it!
3. Healthier Customization
Making your mayonnaise at home allows you total control. You can swap out oils, play with flavors, and adjust seasoning to meet your dietary needs. You can choose healthier oils or add herbs for extra zing.
4. No Preservatives
Store-bought mayonnaise often contains preservatives that you really don’t need. With this homemade version, you skip the chemicals and enjoy pure, wholesome goodness that you can feel good about eating.
How Does It Taste?
Let’s get to the delectable part. Homemade mayonnaise is rich and creamy, with a tangy kick from the vinegar and a hint of depth from the garlic. It’s far superior to anything from a jar. The flavor is fresher, more vibrant, and customizable. You can make it as tangy or as subtle as you’d like.
You know how that first bite of a sandwich with fresh mayonnaise feels? That richness coats your palate in a way that no processed mayo can mimic. You’ll find every dollop of this mayonnaise adds happiness to your dish.
What Sets This Recipe Apart?
This recipe stands out from the typical store-bought mayonnaise because you’re getting a taste that’s uniquely yours. It lacks the overly sweet, somewhat bland flavor you’d find in commercial varieties. Here’s what makes it shine:
1. Control Over Flavor
With homemade mayo, you control the flavor. Vinegar can take a backseat or can be the star. The garlic adds personality, turning a simple condiment into something extraordinary.
2. Freshness at Its Core
You can whip this up in minutes, using ingredients right from your kitchen. No need to plan a trip to the grocery store to stock up on mayos. Just head into your fridge and pantry.
3. Personal Touch
Whether you like a bit of spice or a hit of garlic, the flexibility to adjust flavors means you can tailor it to your meals. Think sriracha mayo for spicy lovers or lemon for a zesty kick.
4. No Additives, Just Ingredients
There are no artificial flavors here. Just pure ingredients. It’s about simplicity, and in a world crowded with processed foods, simplicity is refreshing.
The Ingredients
Now, let’s lay out the star players in this mayonnaise masterpiece:
- 1 cup (240ml) neutral-tasting oil (safflower or vegetable oil works beautifully)
- 1 tablespoon red wine vinegar (or white wine vinegar, if you prefer)
- 1 small garlic clove (finely grated for depth)
- 1 tablespoon smooth Dijon-style mustard (adds kick)
- 1/4 teaspoon ground white pepper (just a hint of spice)
- 1 large farm-fresh egg (the emulsifier)
- 1/4 teaspoon fine sea salt (to taste)
These ingredients are easy to find, and most are likely already in your kitchen.

Instructions
Let’s get into it, step by step. This isn’t rocket science, but it does require a bit of technique.
Step 1: Prepare Your Equipment
Grab a tall glass jar (like a mason jar) and an immersion blender. If you don’t have an immersion blender, a regular blender works as well. A whisk can do the job too, but it’ll take some muscle.
Step 2: Add Ingredients
Add the egg to the jar. Then, layer the mustard, garlic, vinegar, salt, and pepper on top. Finally, pour in the oil. Make sure everything is settled neatly in the jar.
Step 3: Blend Away
Submerge the immersion blender all the way to the bottom of the jar. Turn it on and hold steady for about 15 seconds. You’ll see the ingredients start to mix. Slowly move the blender up and down, blending until the mayo thickens to your desired consistency.
Step 4: Taste and Adjust
Now, it’s time to taste your creation. Adjust the flavor with more salt, vinegar, or mustard according to your preference.
Step 5: Store It Right
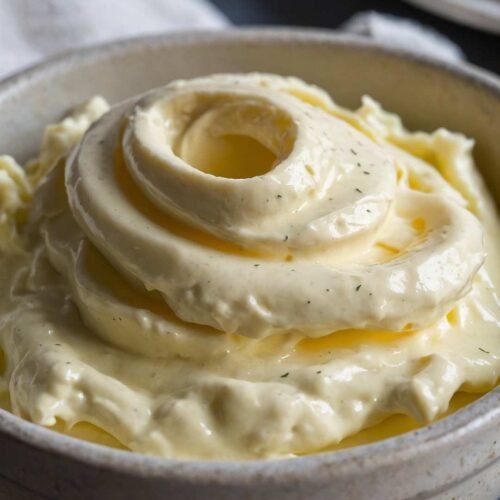
Once you’re satisfied, transfer your mayo into a clean jar with a lid. Refrigerate it for up to a week.
Notes
Use Fresh Ingredients: Ensure all your ingredients, especially the egg, are fresh for the best outcome.
Temperature Matters: Room temperature ingredients emulsify better. If your egg is cold, let it sit out for a bit before using.
Oil Choice: While neutral oils are best, try using flavored oils for a twist.
Blender Goodies: If using a blender, start slow and gradually increase the speed; this prevents splatter.
Add Flavors: Feel free to blend in herbs, spices, or even hot sauce for unique variations.
Nutrition Information
Homemade mayonnaise generally contains:
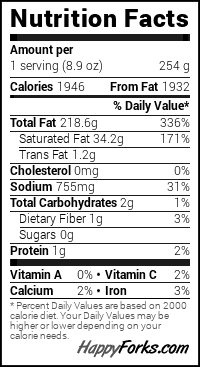
These numbers can adjust based on your chosen ingredients, such as the type of oil or additional flavors.
How Do You Store This Homemade Mayonnaise?
Store your homemade mayonnaise in an airtight container in the refrigerator. It will keep fresh for about a week. It’s best to label the container so you don’t forget when you made it. Trust me, you want to use it fresh!
Sides for Homemade Mayonnaise
What goes perfectly with mayonnaise? Here are a few suggestions:
1. Crispy Sweet Potato Fries
Sweet potato fries, hot and crispy, become divine when dipped into homemade mayo. The richness of the mayo balances the sweetness of the fries impeccably.
2. Fresh Veggie Platter
Serve up an array of colorful veggies like carrots, celery, and bell peppers. The mayo serves as a delectable dip that elevates snacking to an art form.
3. Classic Tuna Salad
A generous scoop of homemade mayo in a tuna salad pulls everything together. The freshness brings a new twist to this classic dish, making it a potluck favorite.

What Alternatives Can You Use for the Ingredients?
In case you don’t have an ingredient on hand, worry not! Here are some alternatives:
1. Oil Substitutes
If you’re out of safflower or vegetable oil, try using light olive oil or avocado oil. You will still get that lovely creamy texture without compromising flavor.
2. Vinegar Alternatives
Instead of red wine vinegar, lemon juice works equally well. It adds a bright acidity that beautifully complements the mayo.
3. Mustard Variations
Don’t have Dijon mustard? Yellow mustard can do the trick. Just remember that it will shift the flavor profile slightly.
4. Garlic Alternatives
If garlic isn’t your thing, you can skip it or use a dash of garlic powder. Your mayo will still be delicious!
Homemade Mayonnaise Recipe
Equipment
- :A larger food processor with attached bowl, mixing bowl
Ingredients
- 1 cup 240ml neutral-tasting oil
- 1 tablespoon red wine vinegar
- 1 small garlic clove
- 1 tablespoon smooth Dijon-style mustard
- 1/4 teaspoon ground white pepper
- 1 large farm-fresh egg
- 1/4 teaspoon fine sea salt
Instructions
Step 1: Prepare Your Equipment
- Grab a tall glass jar (like a mason jar) and an immersion blender. If you don’t have an immersion blender, a regular blender works as well. A whisk can do the job too, but it’ll take some muscle.
Step 2: Add Ingredients
- Add the egg to the jar. Then, layer the mustard, garlic, vinegar, salt, and pepper on top. Finally, pour in the oil. Make sure everything is settled neatly in the jar.
Step 3: Blend Away
- Submerge the immersion blender all the way to the bottom of the jar. Turn it on and hold steady for about 15 seconds. You’ll see the ingredients start to mix. Slowly move the blender up and down, blending until the mayo thickens to your desired consistency.
Step 4: Taste and Adjust
- Now, it’s time to taste your creation. Adjust the flavor with more salt, vinegar, or mustard according to your preference.
Step 5: Store It Right
- Once you’re satisfied, transfer your mayo into a clean jar with a lid. Refrigerate it for up to a week.
Notes
Temperature Matters: Room temperature ingredients emulsify better. If your egg is cold, let it sit out for a bit before using.
Oil Choice: While neutral oils are best, try using flavored oils for a twist.
Blender Goodies: If using a blender, start slow and gradually increase the speed; this prevents splatter.
Add Flavors: Feel free to blend in herbs, spices, or even hot sauce for unique variations.
Nutrition
Frequently Asked Questions
1. Can I use raw eggs?
Yes, but using pasteurized eggs is a smart choice. It minimizes the risk of foodborne illness, allowing you to enjoy your mayo with peace of mind.
2. What can I do with leftover mayonnaise?
There are countless uses! Spread it on sandwiches, blend it into salad dressings, or use it in dips. Think beyond the jar!
3. How can I make my mayo thinner?
If you find your mayo too thick, simply whisk in a bit of water or lemon juice until you reach the desired consistency.
4. Can I freeze homemade mayonnaise?
Freezing is not recommended. The texture changes when thawed, leading to a separated and watery mayo. It’s best enjoyed fresh.
Conclusion
Making homemade mayonnaise isn’t a chore; it’s a fun kitchen adventure! With a few simple ingredients and your trusty immersion blender, you can whip up a creamy condiment that will leave store-bought varieties in the dust. The freshness, customization, and sheer delight of this mayo will win you over. So crank up your culinary skills, and let’s get making. Your sandwiches and salads will thank you!
All set? Time to get in the kitchen and create some magic with homemade mayonnaise. Enjoy every creamy bite!