
Before we dive into the recipe, let’s talk about what pairs seamlessly with tuna salad. There’s something wonderful about the creamy texture and savory flavor that opens the door to various accompaniments. Think of crisp lettuce leaves serving as the perfect vessel for scooping, or crunchy whole-grain crackers offering that satisfying crunch.
If you’re feeling adventurous, consider serving your tuna salad alongside a fresh avocado. Slice it in half, remove the pit, and scoop some of the tuna mix right into the avocado. The combination is delicious. For a light lunch, a side of fruit, perhaps sliced strawberries or a medley of grapes, adds a refreshing contrast.
Now, if we’re talking drinks, a cold iced tea or sparkling water with a hint of lemon complements the dish beautifully. Ready to learn more about this delightful recipe?

You’ll Also Like These Recipes
- Yummy Buffalo Wild Wings Coleslaw Recipe
- Shake Shack Spicy Fries
- Delightful Shake Shack Buttermilk Herb Mayo
Why This Recipe is a Game Changer
Tuna salad isn’t just a classic; it’s a staple in my kitchen. I love how simple it is to prepare while still being incredibly satisfying. Packed with protein, it checks off those nutritional boxes while delighting the taste buds. Plus, this recipe doesn’t call for any strange or hard-to-find ingredients. I often have everything on hand!
Growing up, I was always skeptical of the tuna salad my mom made. It seemed bland and unexciting. However, I set out to create my own version, adding freshness and flavor while still being as quick and straightforward as possible. You know how certain meals can skyrocket your spirits? For me, this dish is one.
Ingredients List
Here’s what you’ll need to create your own tuna salad masterpiece:
1 tablespoon lemon juice – a splash of brightness.
2 tablespoons red onion, minced – for crunch and that perfect bite.
1/3 cup celery, finely chopped (about 1 rib) – brings a nice crunch.
1 cup mayonnaise (or less, to taste) – creaminess at its best.
1 clove garlic, minced – because everything is better with garlic.
Salt and freshly ground black pepper – to season things just right.
4 (5 ounce) cans tuna, packed in water, drained – the star of the show.
2 tablespoons sweet pickle relish – adding a hint of sweetness.

How to Make Tuna Salad
Step 1: Prepare Your Ingredients
Start by gathering all your ingredients. This makes the process smooth and efficient. I often chop the celery and mince the red onion first. The crunchiness of the celery adds texture, while the red onion gives a zesty kick.
Step 2: Mix the Base
In a mixing bowl, combine the mayonnaise, lemon juice, garlic, salt, and pepper. Stir until you achieve a nice, smooth consistency. This creamy dressing is the heart of your salad. Keep tasting to ensure it meets your flavor preference. Adjust the mayo or seasoning as needed.
Step 3: Add the Tuna
Open those cans of tuna and drain them thoroughly; we want a salad, not a tuna soup! Flake the tuna into your bowl of creamy goodness. Gently fold it into the mixture using a spatula. You want to maintain some of that tuna’s chunkiness for texture.
Step 4: Incorporate the Crunch
Now it’s time to add the chopped celery and minced red onion. These ingredients not only contribute to the texture but also enhance the overall taste.
Gently mix them in, letting those flavors mingle without turning the tuna into a mushy mix.
Step 5: Add the Relish
Now comes the sweet pickle relish. It adds a fun tang and subtle sweetness that balances out the savoriness of the tuna. Fold it in gently. The colors and textures should start popping at this point!
Step 6: Final Seasoning
Taste your salad one last time. This step is crucial. Is it seasoned enough? Salt, pepper, or even a tad more lemon can make a world of difference. Make adjustments based on your preferences.
Step 7: Serve or Chill
You can serve the salad right away, or let it chill in the fridge. I find that the flavors meld together beautifully after some time in the refrigerator. If you’re looking for a refreshing summer meal, chilling the salad for at least 30 minutes is ideal.
Step 8: Enjoy!
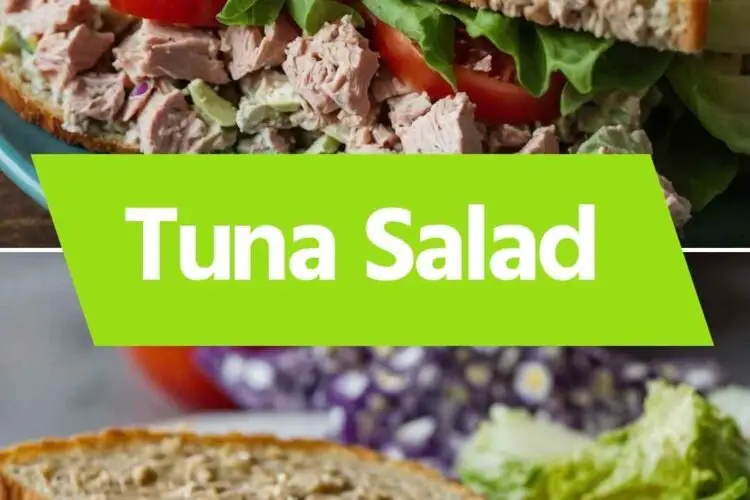
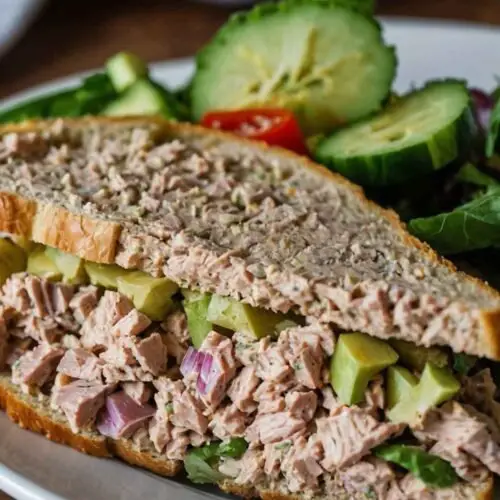
Serve your tuna salad on top of lettuce leaves, or stuff it into a sandwich. Whatever fits your craving at the moment!
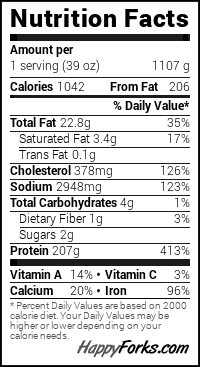
Nutrition Information
Recipe Notes
Mayonnaise: The mayo is a key component in this recipe. You can adjust how much you want based on your taste preference. I tend to start with one cup and go from there, adding more if needed. You can also use Greek yogurt for a lighter option.
Tuna: Always choose the best quality tuna. I lean towards brands that use sustainably sourced fish. It not only tastes better but also supports ethical fishing practices.
Relish: Sweet pickle relish can be swapped out for dill relish if you prefer a more tangy finish.
Garlic: If you’re a garlic lover like me, consider roasting a clove for a milder flavor, or adding a pinch of garlic powder if you want an easier alternative.
Onion: Red onion is great for its mild flavor. However, if you need something less intense, go for green onions.
Celery: You could substitute with chopped bell pepper for a different crunch and flavor profile.

Recipe Variations
Feeling creative? Here are a few ways you can switch up the basic tuna salad recipe:
Mediterranean Twist: Add chopped olives, sun-dried tomatoes, and feta cheese for a Mediterranean flair.
Spicy Kick: Mix in some Sriracha or diced jalapeños for those who enjoy heat.
Herbed Delight: Fresh herbs like dill or parsley can elevate the dish, offering vibrant flavors.
Add Beans: Toss in a can of white beans for added protein and texture.
Fruit Twist: Diced apples or grapes can add a surprising sweetness that contrasts nicely with the savory aspects.
Crunchy Version: Add diced bell peppers, cucumber, or even shredded carrots for extra crunch.
Tuna Salad
Equipment
- Mixing Bowl, Teaspoon
Ingredients
- Ingredients
- 1 tablespoon lemon juice – a splash of brightness.
- 2 tablespoons red onion minced – for crunch and that perfect bite.
- 1/3 cup celery finely chopped (about 1 rib) – brings a nice crunch.
- 1 cup mayonnaise or less, to taste – creaminess at its best.
- 1 clove garlic minced – because everything is better with garlic.
- Salt and freshly ground black pepper – to season things just right.
- 4 5 ounce cans tuna, packed in water, drained – the star of the show.
- 2 tablespoons sweet pickle relish – adding a hint of sweetness.
Instructions
Step 1: Prepare Your Ingredients
- Start by gathering all your ingredients. This makes the process smooth and efficient. I often chop the celery and mince the red onion first. The crunchiness of the celery adds texture, while the red onion gives a zesty kick.
Step 2: Mix the Base
- In a mixing bowl, combine the mayonnaise, lemon juice, garlic, salt, and pepper. Stir until you achieve a nice, smooth consistency. This creamy dressing is the heart of your salad. Keep tasting to ensure it meets your flavor preference. Adjust the mayo or seasoning as needed.
Step 3: Add the Tuna
- Open those cans of tuna and drain them thoroughly; we want a salad, not a tuna soup! Flake the tuna into your bowl of creamy goodness. Gently fold it into the mixture using a spatula. You want to maintain some of that tuna’s chunkiness for texture.
Step 4: Incorporate the Crunch
- Now it’s time to add the chopped celery and minced red onion. These ingredients not only contribute to the texture but also enhance the overall taste.
- Gently mix them in, letting those flavors mingle without turning the tuna into a mushy mix.
Step 5: Add the Relish
- Now comes the sweet pickle relish. It adds a fun tang and subtle sweetness that balances out the savoriness of the tuna. Fold it in gently. The colors and textures should start popping at this point!
Step 6: Final Seasoning
- Taste your salad one last time. This step is crucial. Is it seasoned enough? Salt, pepper, or even a tad more lemon can make a world of difference. Make adjustments based on your preferences.
Step 7: Serve or Chill
- You can serve the salad right away, or let it chill in the fridge. I find that the flavors meld together beautifully after some time in the refrigerator. If you’re looking for a refreshing summer meal, chilling the salad for at least 30 minutes is ideal.
Step 8: Enjoy!
- Serve your tuna salad on top of lettuce leaves, or stuff it into a sandwich. Whatever fits your craving at the moment!
Notes
Nutrition
Frequently Asked Questions
1. Is tuna salad healthy for you?
Absolutely! Tuna salad is a great source of protein, omega-3 fatty acids, and other key nutrients. The presence of vegetables adds fiber, making it a well-rounded meal. Keep the seasoning balanced, and it’s a smart, nutritious choice.
2. Can I use fresh tuna instead of canned?
Yes! Fresh tuna can offer a nicer texture and flavor profile. If you’re going this route, grill or sear it first, then let it cool before flaking it into your salad for the best results.
3. How can I store leftover tuna salad?
Store leftover tuna salad in an airtight container in the fridge. It should keep for about 3-5 days. Remember, the longer it sits, the more the flavors will change.
4. Can I make this salad ahead of time?
Definitely. In fact, making it a few hours or overnight in advance enhances the flavors as they mix and meld. Just remember to keep it chilled.
5. What can I replace mayonnaise with if I want a healthier option?
Greek yogurt or avocado can serve as great substitutes for mayonnaise, adding creaminess while decreasing calories and fats.
6. How can I make tuna salad without any added fat?
You can create a tuna salad by using crushed chickpeas or mashed avocado as a base. Add in mustard and vinegar for tang and bring in some veggies. It’s a lighter, fat-free option that still satisfies
Conclusion
Tuna salad is a fantastic dish that brings together simplicity, nutrition, and tons of flavor. It’s one of my go-to meals, whether for a quick lunch or a picnic side dish. By mixing in fresh ingredients and experimenting with flavors, you can create a version that feels uniquely yours.
So, gather your ingredients and enjoy the process! Whether you’re serving it to a crowd or just indulging for yourself, every scoop is bound to bring a smile to your face. In the end, cooking should be fun! Happy salad-making!